Common Film & Scan Issues (and What You Can Do About Them)
You download your film scans, you start flipping through the image files, and then you spot it—there’s something… weird on your scan. Sound familiar?
Every film photographer has witnessed a dreaded film scan anomaly, from strange lines and dots to discolored images to portions of the image being blacked out.
Don’t be left in the dark when it comes to your film! Let Richard Photo Lab break down the causes and solutions of common film developing & scanning issues for you.
BONUS: If we spot any of these issues in your film order, it will be noted on Richard's Film Report that you'll receive with your scans letting you know what we saw, and on which rolls!
UNDEREXPOSED FILM
THE PROBLEM: Your negative was exposed to light for too short a time to record a well-defined image on the film.
HOW TO RECOGNIZE IT: Your scans will look dark/faded, grainy, and have very low contrast. Your negative film will be very faint/see-through.
HOW TO FIX IT: Get yourself a light meter so you can adjust your camera settings correctly for different lighting scenarios. You might also want to shoot a test roll to get a better handle on exposure in general. If the underexposure is not too intense, you can adjust affected frames in a photo editor such as Lightroom or Photoshop to get "passable" images.

OVEREXPOSED FILM
THE PROBLEM: Your negative was exposed to light for too long, making your negatives too dense.
HOW TO RECOGNIZE IT: The highlights in your scanned images will be dull and gray—this is because, in an effort to preserve definition throughout the mid-tones, our scanners must reduce the overall lightness of your image. Your negatives will be very high contrast between the darkest dark and the lightest light, but the dark, dense areas dominate throughout.
HOW TO FIX IT: Grab a light meter to properly judge lighting, and consider shooting some test rolls. Overexposing color film a couple of stops can actually be a powerful shooting tool in film photography, but only if you can understand when and why. If film is not too severely overexposed, some moderate post-production work can be done. It won’t be great, but it will be tolerable.

OBSTRUCTION IN YOUR CAMERA
THE PROBLEM: Something yucky has wormed its way into your camera. Maybe it’s hair, maybe it’s dust, maybe it’s an unidentifiable gunk. It can even be the protective paper backing on your 120 film.
HOW TO RECOGNIZE IT: Obstructions in your camera will appear on your film scans as dark marks, oftentimes appearing on multiple frames in a row.
HOW TO FIX IT: Keep your camera as clean as a whistle with regular maintenance at home—clean your camera back and insert with canned air before every shoot. Reoccurring obstructions can sometimes be a piece of your camera itself, and should be repaired at a camera shop.
OBSTRUCTION IN THE FILM SCANNER
THE PROBLEM: Dust and other small particles are clinging to your film or the scanning bed.
HOW TO RECOGNIZE IT: Obstructions in the scanner will appear on your films scans as tiny white marks or lines.
HOW TO FIX IT: Richard always takes care to prevent this from happening when scanning your film, including brushing & vacuuming your negs and digitally removing noticeable dust and scratches (either with a special automated software or manually). We clean dust, etc. that is visible at an image size of 25-30%. If you still see dust on your scans, please get in touch with the Richard crew!

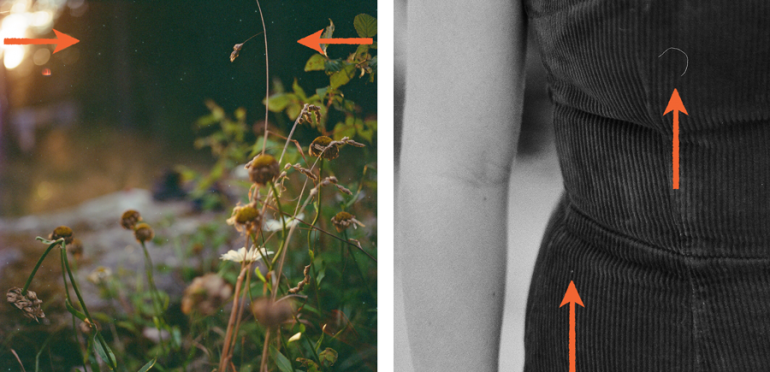
LIGHT LEAKS
THE PROBLEM: Light is getting into your camera. This is usually due to a faulty back, in which light-tight seals are damaged or worn.
HOW TO RECOGNIZE IT: Light leaks appear as faded or discolored streaks or bursts in a scan—they will extend outside the frame to the rebate edge.
HOW TO FIX IT: Double check that the seals on your camera are light tight by shooting another roll of film. If it comes back clean, then it was probably just a simple user error—if not, take your camera to get checked out by a pro.

FOGGING
THE PROBLEM: Fogging can be caused by a number of things, including heat damage to your film, aging of film, or accidental exposure to light (like opening your camera mid-roll).
HOW TO RECOGNIZE IT: Fogging is similar to a light leak, causing fading & discoloration. However, it affects the film surface more evenly overall, whereas a light leak typically emanates from a concentrated spot.
HOW TO FIX IT: Eliminate the variables to find the root of the problem. Shoot a test roll with a brand spankin’ new roll of film—if the roll comes back clear, then the issue was caused by your original film. If not, head to a camera repair shop.

FLARES
THE PROBLEM: Light is refracting and reflecting within your lens. This happens when your subject is backlit and you are pointing your camera directly at the sun.
HOW TO RECOGNIZE IT: Flares appear as bright, low contrast, muddy or discolored patches that oftentimes (but not exclusively) develop in the corners of an image.
HOW TO FIX IT: Always be mindful of your light source to avoid flare, and consider using a lens hood (or your hands!) to block any stray light. Sometimes flares can be dulled in post-production by adjusting the color balance over the flare—though, some artists love the look of flares in their images!

LOOSE FILM ROLL
THE PROBLEM: When shooting medium format 120 or 220 film, your film is not tightly rolled after exposure. This can happen because the film was not secured properly (with tape or film strip adhesive) and it unraveled, or your camera never rolled the film tightly enough to begin with (common in disposable cameras).
HOW TO RECOGNIZE IT: There is a soft red or white line across an entire edge of your scanned frame—also known as “edge fog”.
HOW TO FIX IT: Make sure your film is tightly sealed after removing it from your camera. If you suspect your camera could be at fault, you’ll need to head to a repair shop to confirm that it’s winding film correctly. Because damage from a loose roll typically stays at the edge of a frame, some scans with this issue can be saved by doing a little cropping.

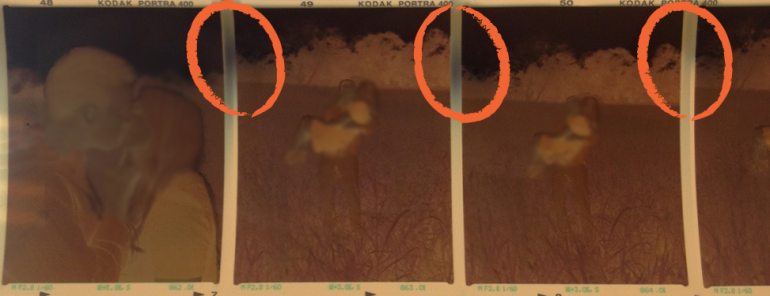
CAMERA OPENED MID FILM ROLL
THE PROBLEM: This one is pretty obvious—your camera opened in the middle of shooting your roll. We’re all human, it happens!
HOW TO RECOGNIZE IT: Large blocks of your scan are discolored. This can range from an orange-red tint on parts of your image to completely bleaching it out. The damage will cover the frame line and rebate edge, but it’s much larger than a regular ol’ light leak.
HOW TO FIX IT: There’s not a whole lot you can do to save an image when this happens, typically because the damage covers so much of the frame. On the bright side, after seeing the results you’ll be extra careful it doesn’t happen again!


CAMERA ADVANCEMENT MALFUNCTION
THE PROBLEM: Your camera is not moving film through the camera body uniformly (like it should).
HOW TO RECOGNIZE IT: When you look at your negatives, your frames will either be too far apart (giving you less frames on the roll) or they will overlap (resulting in double exposures over a portion of the scan).
HOW TO FIX IT: Your camera may need a checkup from a pro. However, this issue can also occur if your film is loaded or manually advanced incorrectly.

TWIN CHECK STICKER
THE PROBLEM: Twin check stickers are applied to your negatives in the dark before film processing in order to help us track it through the lab; ordinarily, there is not an image frame on this portion of the film. If there is, this is another sign that there is a camera advancement malfunction or film-loading error.
HOW TO RECOGNIZE IT: There is a sticker on the last frame of your roll, and a big white rectangle on the corresponding scan.
HOW TO FIX IT: First, double-check that you are loading your film correctly and starting your exposures at the right place on the roll. If you are still seeing issues with advancement, your camera may need a tune up! Some image frames can be saved with a little post-production magic, depending on the image and how far the sticker imposes on the frame.

SHUTTER SYNC MALFUNCTION
THE PROBLEM: When you are using a flash and a camera with a curtain shutter, the "sync speed" is the fastest shutter speed you should use. If you set a faster shutter speed, the shutter starts closing before your flash has gone off, literally blocking a portion of your frame from being exposed.
HOW TO RECOGNIZE IT: There is a thick, black, uniform line on your image that reaches the edge of the frame.
HOW TO FIX IT: Slow down the shutter, speed demon! Be wary of sync speed, because there is no saving these frames once they are exposed.

CAMERA SCRATCH
THE PROBLEM: Typically, either dust, dirt, or sand have gotten into the camera insert or camera back, scratching the base side of your film. This can also occur on the emulsion side of your film due to dirt, nicks, or sticky rollers.
HOW TO RECOGNIZE IT: There is a very sharp, straight line across your scan—it can be light or dark. These lines sometimes start and stop in sequence with the exposures. Camera scratches are always the same direction across your film frames because of the direction that the film travels through your camera. Sometimes, light scratches will be removed by the automated software Richard uses to remove dust from film scans—in this case, you will only see the scratch on your negatives.
HOW TO FIX IT: It’s time for a DEEEEEEP clean from a professional. The rollers, the insert, everything needs a good scrub-a-dub-dub! And be sure you’re doing basic maintenance on the regular, cleaning your camera with canned air before each shoot. Scratches can often be removed from scans by doing some post-production work in Photoshop.

HANDLING DAMAGE
THE PROBLEM: Your film negative was damaged when someone at the lab was handling your film or your negatives were stored improperly—this scratching or denting can then show up in your scans.
HOW TO RECOGNIZE IT: Light colored lines (scratches) or crescents (dents) appear on your scan. They are not geometric or uniform, and they do not appear the same across multiple frames.
HOW TO FIX IT: At Richard, we take every precaution to prevent damage to your negatives: hiring experienced technicians, using protective gloves and well-maintained equipment, and always sleeving your negatives. When damage does occur, Richard will retouch the damage out of your image files. If you ever see handling scratches and crescents on your scans, please contact the lab!

SCAN LINES
THE PROBLEM: There is dust or dirt interfering with the film scanning equipment.
HOW TO RECOGNIZE IT: There is a thin, straight line across your scanned image. It can be differentiated from pressure plate scratches by the visible digital noise around the line.
HOW TO FIX IT: At Richard, we routinely clean and recalibrate our equipment to prevent this issue. If you think you see scan lines in your order, please reach out to us immediately!

THE STAIRCASE EFFECT
THE PROBLEM: Honestly, we aren’t exactly sure what causes this issue to occur (though there is speculation that reflections from the film itself during standard operation of the machine could be the culprit). What we DO know for sure is that scans displaying the staircase effect come from very overexposed negatives.
HOW TO RECOGNIZE IT: There are soft, evenly-spaced, dark bands overlaying your film photo image from edge to edge.
HOW TO FIX IT: Make sure you aren’t overexposing your negatives! Use a high-quality light meter every time you shoot. Some images can be altered in post-production to minimize the appearance of banding.

WATER DAMAGE
THE PROBLEM: Your film got wet from condensation, a spill in your camera bag, an accidental dip in the pool, etc.
HOW TO RECOGNIZE IT: The results can range—we’ve seen irregular waves through the image, a speckled pattern, large black splotches, and extreme discoloration. But the one thing this type of damage always has is a distinctly “liquid” look.
HOW TO FIX IT: If you know you have gotten your film wet, send that roll to the lab immediately! Be sure to include a note about the damage in the "SPECIAL INSTRUCTIONS" portion of the online ordering form. Seal your film in an air-tight bag/container, too, so it does not dry! This can help lessen the damage. Scans showing water damage are typically beyond saving—but who knows, maybe you’ll end up loving the organically abstract effects displayed in each unique photo!

X-RAY DAMAGE
THE PROBLEM: Your film has been exposed to a form of electromagnetic radiation. This usually happens when you travel via plane with your film.
HOW TO RECOGNIZE IT: There is a large, wavy pattern across your entire roll of negatives.
HOW TO FIX IT: Richard wrote an extensive blog post on x-ray damage you will want to read, but here’s the short & sweet version—never put film in luggage going in the cargo hold of a plane. Opt for a hand check of your carry-ons instead of using lead-lined bags, and clearly label packages being shipped internationally.


